Getting started
This page describes how to get started with dom-preview
Installation
In order to install dom-preview type.
npm install --save-dev dom-previewINFO
dom-preview is framework-agnostic. This means that you have to adjust some configuration for each framework. In the following examples, we are using vitest,
This is a step-by-step walk-though that will show you how dom-preview is intended to be used, which pitfalls my appear on the way and how to solve them.
In order to use dom-preview, the component under test needs to be rendered in a way that their dom elements are accessible via the global window object.
I highly recommend, that you use the Testing Library to write your tests. Not only because it attaches components to the DOM, but also because it provides an interface to make tests more realistic and stable.
For the examples, we will use the following component
<!-- eslint-disable vue/multi-word-component-names -->
<script setup>
import { computed, ref } from "vue";

const word = ref("");
const count = computed(() => {
  return word.value.length;
});
</script>
<template>
  <div class="counter">
    <input
      class="counter__input"
      placeholder="Type a word"
      type="text"
      v-model="word"
    />
    <span>'{{ word }}' has {{ count }} characters.</span>
  </div>
</template>
<style scoped>
.counter {
  color: lightgrey;
  border: 1px solid green;
  background-color: darkgreen;
  display: inline-flex;
  align-items: center;
  gap: 1rem;
  padding: 1rem;
}
.counter__input {
  background-color: black;
  border: 1px solid white;
  padding: 0.5rem;
}
</style>Basic usage
Start the server
npx dom-previewThe web-frontend of dom-preview now runs on http://localhost:5007/__dom-preview__/
Add a debug statement to your test.
import { describe, it } from "vitest";
import { render } from "@testing-library/vue";
import Counter from "../Counter.vue";
import { debug } from "dom-preview";

describe("Counter", () => {
  it("example without any expects", () => {
    render(Counter);
    debug();
  });
});
The dom-preview UI will now look like this:
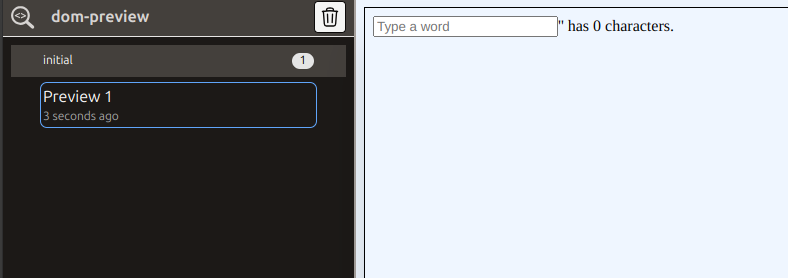
You can use the dev-tools to inspect the DOM, but ths component still looks different compared to the actual one.
Configure tests to emit CSS
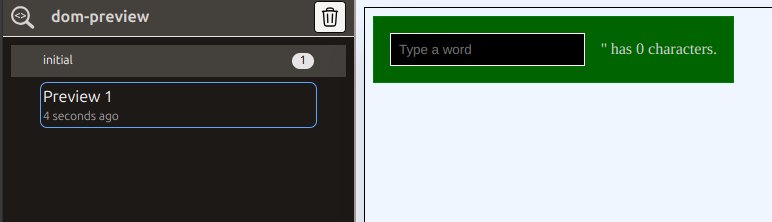
This happens when the tests don't emit CSS. In vitest, you have to add the property css: true the vitest config:
import { defineConfig } from "vitest/config";
import vuePlugin from "@vitejs/plugin-vue";

export default defineConfig({
  plugins: [vuePlugin()],
  test: {
    css: true,
    environment: "jsdom",
  },
});
If we run the tests now, the result looks much better:
Multiple DOM-previews
Now assume that we have written multiple tests and done some user interactions which all change the DOM. You can put multiple debug() statements into your code.
describe("Counter", () => {
it("renders a button with the counter 0", () => {
render(Counter);
expect(screen.getByPlaceholderText("Type a word")).not.toBeNull();
expect(screen.getByText("'' has 0 characters.")).not.toBeNull();
debug();
});
it("increases counter on click", async () => {
const user = userEvent.setup();
render(Counter);
debug();
const inputField =
screen.getByPlaceholderText<HTMLInputElement>("Type a word");
await user.type(inputField, "Hello");
expect(inputField.value).toEqual("Hello");
debug();
expect(screen.getByText("'Hello' has 5 characters.")).not.toBeNull();
});
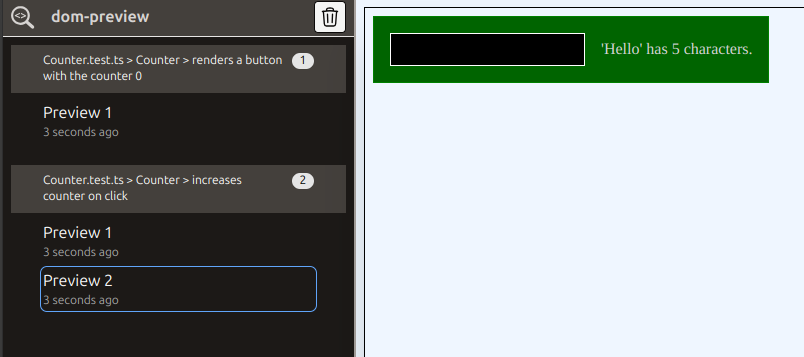
});Each preview will be collected and displayed.
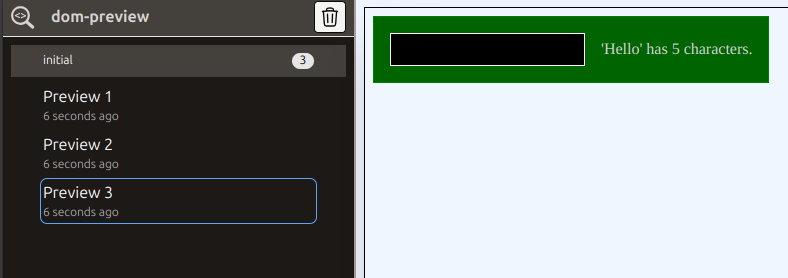
As you can see, all previews are shown in the category "initial" and labeled with increasing numbers. This can be confusing if you have a lot of previews.
We tell dom-preview to use another name instead of "initial". The name of the current test would be nice. In vitest you can get this name via expect.getState().currentTestName. We can add a setupFile to the vitest config to set the current preview context before each test:
vitest.config.ts
import { defineConfig } from "vitest/config";
import vuePlugin from "@vitejs/plugin-vue";

export default defineConfig({
  plugins: [vuePlugin()],
  test: {
    css: true,
    environment: "jsdom",
    setupFiles: ["./setupTests.ts"],
  },
});
setupTests.ts
import { cleanup } from "@testing-library/vue";
import { setDomPreviewContext } from "dom-preview";
import { expect, beforeEach, afterEach } from "vitest";

beforeEach(() => {
  setDomPreviewContext(expect.getState().currentTestName ?? "initial");
});

afterEach(() => {
  cleanup();
});
When we run the tests now, we will get the following output:
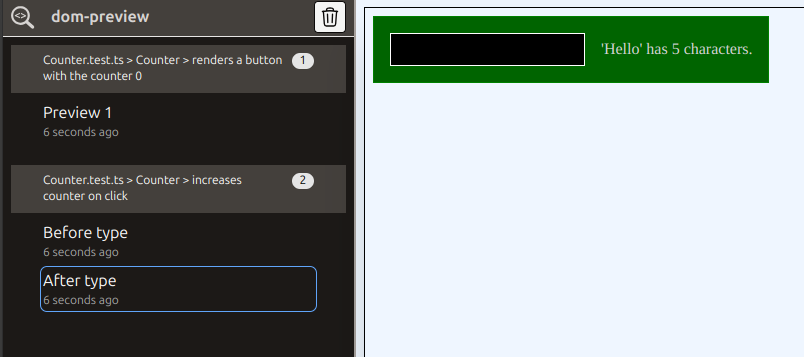
Labels
You can also add labels to debug calls, in order to locate them more easily:
describe("Counter", () => {
  it("renders a button with the counter 0", () => {
    render(Counter);
    expect(screen.getByPlaceholderText("Type a word")).not.toBeNull();
    expect(screen.getByText("'' has 0 characters.")).not.toBeNull();
    debug();
  });

  it("increases counter on click", async () => {
    const user = userEvent.setup();
    render(Counter);
    debug();
    const inputField =
      screen.getByPlaceholderText<HTMLInputElement>("Type a word");
    await user.type(inputField, "Hello");
    expect(inputField.value).toEqual("Hello");
    debug();
    expect(screen.getByText("'Hello' has 5 characters.")).not.toBeNull();
  });
});
The parameter of the debug function will be displayed as name in the ui: